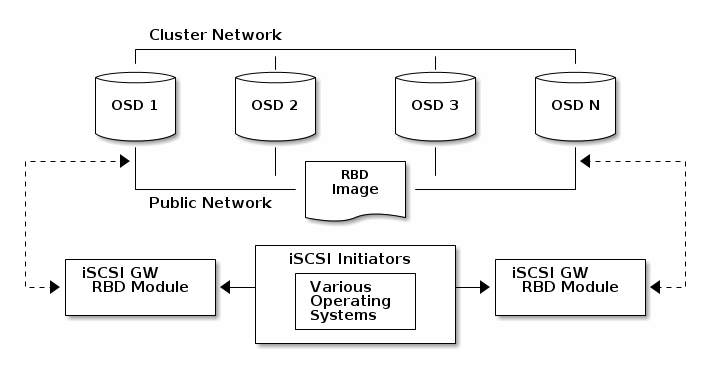
前提准备 首先看到ceph官网给出的大体结构:
可以看到主要分为ceph集群、rbd、iscsi网关、initiator(也就是客户端)构成。
那么所需的准备就如下:
一个HEALTH_OK 的ceph集群,还有剩余的存储空间(给创建的rbd使用)。
这里是我所搭建的集群:
1
2
3
4
5
6
7
8
9
10
11
12
13
14
15
16
17
$ sudo ceph -s cluster: id: 51e9f534-b15a-4273-953c-9b56e9312510 health: HEALTH_OK services: mon: 3 daemons, quorum node1,node2,node3 mgr: node1(active), standbys: node2, node3 mds: cephfs-1/1/1 up {0=node1=up:active} osd: 6 osds: 6 up, 6 in data: pools: 2 pools, 64 pgs objects: 508 objects, 1.9 GiB usage: 26 GiB used, 6.0 TiB / 6.0 TiB avail pgs: 64 active+clean
两台linux主机,作为iscsi网关,可以是集群中的主机。
一台linux主机,作为linux系统下的客户端。
一台windows主机,作为windows系统下的客户端。
配置ceph-iscsi网关 修改osd配置 安装官网所述,先修改osd的配置:
1
2
3
[osd] osd heartbeat grace = 20 osd heartbeat interval = 5
将上述配置添加到所有ceph节点的/etc/ceph/ceph.conf文件中,
当然可以使用ceph-deploy来推送。
1
2
3
4
5
6
7
8
9
10
11
12
13
14
15
16
17
$ vim ceph.conf $ cat ceph.conf [global] fsid = 51e9f534-b15a-4273-953c-9b56e9312510 mon_initial_members = node1, node2, node3 mon_host = 192.168.90.233,192.168.90.234,192.168.90.235 auth_cluster_required = cephx auth_service_required = cephx auth_client_required = cephx public_network = 192.168.0.0/16 [osd] osd heartbeat grace = 20 osd heartbeat interval = 5 $ ceph-deploy --overwrite-conf config push node1 node2 node3
下载所需要的相关rpm包 这里直接选择Using the Command Line Interface ,感觉这个更靠谱一些。
按照官网所述,yum的repo中需要有以下rpm包:
直接yum install试试可以发现,只有targetcli 和python-rtslib 能装上,而且版本都比官网说的要低,好吧,麻烦来了。
经过一段几个小时* 的搜索……从下面链接中找到了rpm包:
新建repo文件:
1
2
3
4
5
6
7
8
9
10
11
12
13
14
15
16
17
18
19
20
$ sudo vim /etc/yum.repo.d/iscsi.repo $ cat /etc/yum.repo.d/iscsi.repo [ceph-iscsi] name=Ceph-iscsi baseurl=https://4.chacra.ceph.com/r/ceph-iscsi/master/88f3f67981c7da15448f140f711a1a8413d450b0/centos/7/flavors/default/noarch/ priority=1 gpgcheck=0 [tcmu-runner] name=tcmu-runner baseurl=https://3.chacra.ceph.com/r/tcmu-runner/master/eef511565078fb4e2ed52caaff16e6c7e75ed6c3/centos/7/flavors/default/x86_64/ priority=1 gpgcheck=0 [python-rtslib] name=python-rtslib baseurl=https://2.chacra.ceph.com/r/python-rtslib/master/67eb1605c697b6307d8083b2962f5170db13d306/centos/7/flavors/default/noarch/ priority=1 gpgcheck=0
这里我使用的是本地源,将上面的包下载到本地源:
1
2
$ sudo yum install --downloadonly --downloaddir=yum/ceph-iscsi/ targetcli python-rtslib tcmu-runner ceph-iscsi $ createrepo -p -d -o yum/ yum/
注意到这里没有包含targetcli 的repo,因为没有找到,使用yum基础的Base源或者是Ceph源可以安装targetcli-2.1.fb46-7.el7.noarch.rpm,
虽然官网需要的是targetcli-2.1.fb47 or newer package,但在后续使用中发现没有影响,所以这里就不用管targetcli 了。
那么这里下载下来的就是:
targetcli-2.1.fb46-7.el7.noarch.rpm
python-rtslib-2.1.fb68-1.noarch.rpm
tcmu-runner-1.4.0-0.1.51.geef5115.el7.x86_64.rpm
ceph-iscsi-3.2-8.g88f3f67.el7.noarch.rpm
ceph-iscsi网关初始配置 如果使用的不是集群内的节点作为ceph-iscsi网关,那就需要进行一些初始的配置。
安装ceph。
从集群中的一台机器上拷贝/etc/ceph/ceph.conf到本机的/etc/ceph/ceph.conf。
从集群中的一台机器上拷贝/etc/ceph/ceph.client.admin.keyring到本机的/etc/ceph/ceph.client.admin.keyring。
当然第2和3步可以直接在deploy节点使用ceph-deploy admin {node-gateway},{node-gateway}就表示网关节点的名字。
可见这里就是为了将ceph-iscsi网关节点变成一个admin节点。
这时在网关节点上应该可以执行相关命令操作ceph集群,例如sudo ceph -s查询当前集群的状态。
安装配置iscsi 这里官网建议先切换到root用户,方便一点:
在两个网关节点上都安装iscsi(注意到上面已经将相关包下载到了本地源,所以可以直接yum安装):
1 # yum install -y ceph-iscsi
服务启动:
先创建rbd pool,如果没有的话。
1
2
3
4
5
6
7
8
# ceph osd lspools 1 cephfs_data 2 cephfs_metadata # ceph osd pool create rbd 128 pool 'rbd' created
创建并修改/etc/ceph/iscsi-gateway.cfg文件:
1
2
3
4
5
6
7
8
9
10
11
12
13
14
15
16
17
18
19
20
21
22
23
24
25
26
27
28
29
30
31
# vim /etc/ceph/iscsi-gateway.cfg # cat /etc/ceph/iscsi-gateway.cfg [config] # Name of the Ceph storage cluster. A suitable Ceph configuration file allowing # access to the Ceph storage cluster from the gateway node is required, if not # colocated on an OSD node. cluster_name = ceph # Place a copy of the ceph cluster's admin keyring in the gateway' s /etc/ceph # drectory and reference the filename here gateway_keyring = ceph.client.admin.keyring # API settings. # The API supports a number of options that allow you to tailor it to your # local environment. If you want to run the API under https, you will need to # create cert/key files that are compatible for each iSCSI gateway node, that is # not locked to a specific node. SSL cert and key files *must* be called # 'iscsi-gateway.crt' and 'iscsi-gateway.key' and placed in the '/etc/ceph/' directory # on *each* gateway node. With the SSL files in place, you can use 'api_secure = true' # to switch to https mode. # To support the API, the bear minimum settings are: api_secure = false # Additional API configuration options are as follows, defaults shown. # api_user = admin # api_password = admin # api_port = 5001 trusted_ip_list = 192.168.90.234,192.168.90.235
上面trusted_ip_list填写的就是两台网关的ip(这里不讨论多网卡的情况)。
在另外一台网关上复制这个文件:
1 $ sudo scp cluster@node2:/etc/ceph/iscsi-gateway.cfg /etc/ceph/iscsi-gateway.cfg
在两台网关上都开启rbd-target-api服务:
1
2
3
# systemctl daemon-reload # systemctl enable rbd-target-api # systemctl start rbd-target-api
配置:(在其中一台网关配置就行)
1
2
3
4
5
6
7
8
9
10
11
12
13
14
15
16
17
18
19
20
21
22
23
24
25
26
27
28
29
30
31
# gwcli /> cd /iscsi-targets /iscsi-targets> create iqn.2003-01.com.redhat.iscsi-gw:iscsi-igw ok /iscsi-targets> cd iqn.2003-01.com.redhat.iscsi-gw:iscsi-igw/gateways /iscsi-target...-igw/gateways> create node2 192.168.90.234 Adding gateway, sync'ing 0 disk(s) and 0 client(s) ok /iscsi-target...-igw/gateways> create node3 192.168.90.235 Adding gateway, sync'ing 0 disk(s) and 0 client(s) ok /iscsi-target...-igw/gateways> cd /disks /disks> create pool=rbd image=disk_1 size=200G ok /disks> cd /iscsi-targets/iqn.2003-01.com.redhat.iscsi-gw:iscsi-igw/hosts /iscsi-target...csi-igw/hosts> create iqn.1994-05.com.redhat:rh7-client ok /iscsi-target...at:rh7-client> auth username=myiscsiusername password=myiscsipassword ok /iscsi-target...at:rh7-client> disk add rbd/disk_1 ok
配置完成,可以看到我当前的目录结构:
1
2
3
4
5
6
7
8
9
10
11
12
13
14
15
16
17
18
19
20
21
22
23
/> ls o- / ......................................................................... [...] o- cluster ......................................................... [Clusters: 1] | o- ceph .......................................................... [HEALTH_WARN] | o- pools .......................................................... [Pools: 3] | | o- cephfs_data ... [(x3), Commit: 0.00Y/2028052096K (0%), Used: 2029431878b] | | o- cephfs_metadata .... [(x3), Commit: 0.00Y/2028052096K (0%), Used: 77834b] | | o- rbd ................ [(x3), Commit: 200G/2028052096K (10%), Used: 15352b] | o- topology ................................................ [OSDs: 6,MONs: 3] o- disks ........................................................ [200G, Disks: 1] | o- rbd ............................................................ [rbd (200G)] | o- disk_1 ................................................ [rbd/disk_1 (200G)] o- iscsi-targets ............................... [DiscoveryAuth: None, Targets: 1] o- iqn.2003-01.com.redhat.iscsi-gw:iscsi-igw ..................... [Gateways: 2] o- disks .......................................................... [Disks: 1] | o- rbd/disk_1 ............................................... [Owner: node3] o- gateways ............................................ [Up: 2/2, Portals: 2] | o- node2 ............................................. [192.168.90.234 (UP)] | o- node3 ............................................. [192.168.90.235 (UP)] o- host-groups .................................................. [Groups : 0] o- hosts .............................................. [Hosts: 1: Auth: CHAP] o- iqn.1994-05.com.redhat:rh7-client .......... [Auth: CHAP, Disks: 1(200G)] o- lun 0 ................................ [rbd/disk_1(200G), Owner: node3]
linux客户端配置 在作为客户端的linux主机上。
安装相关组件:
1
2
$ sudo yum install -y iscsi-initiator-utils $ sudo yum install -y device-mapper-multipath
开启multipathd服务并进行配置:
1
2
3
4
5
6
7
8
9
10
11
12
13
14
15
16
17
18
19
$ sudo mpathconf --enable --with_multipathd y $ sudo vim /etc/multipath.conf $ sudo cat /etc/multipath.conf devices { device { vendor "LIO-ORG" hardware_handler "1 alua" path_grouping_policy "failover" path_selector "queue-length 0" failback 60 path_checker tur prio alua prio_args exclusive_pref_bit fast_io_fail_tmo 25 no_path_retry queue } }
修改客户端名称:
1
2
3
4
$ sudo vim /etc/iscsi/initiatorname.iscsi $ sudo cat /etc/iscsi/initiatorname.iscsi InitiatorName=iqn.1994-05.com.redhat:rh7-client
修改chap认证配置文件:
1
2
3
4
5
6
7
8
9
10
11
12
13
14
15
16
17
18
$ sudo vim /etc/iscsi/iscsid.conf $ sudo cat /etc/iscsi/iscsid.conf ... # ************* # CHAP Settings # ************* # To enable CHAP authentication set node.session.auth.authmethod # to CHAP. The default is None. node.session.auth.authmethod = CHAP # To set a CHAP username and password for initiator # authentication by the target(s), uncomment the following lines: node.session.auth.username = myiscsiusername node.session.auth.password = myiscsipassword ...
发现target:
1
2
3
4
$ sudo iscsiadm -m discovery -t st -p 192.168.90.234 192.168.90.234:3260,1 iqn.2003-01.org.linux-iscsi.rheln1 192.168.90.235:3260,2 iqn.2003-01.org.linux-iscsi.rheln1
登入target:
1 $ sudo iscsiadm -m node -T iqn.2003-01.org.linux-iscsi.rheln1 -l
查看是否成功:
1
2
3
4
5
6
7
$ sudo multipath -ll mpatha (360014050fedd563975249adb2e84e978) dm-2 LIO-ORG ,TCMU device size=200G features='1 queue_if_no_path' hwhandler='1 alua' wp=rw |-+- policy='queue-length 0' prio=50 status=active | `- 3:0:0:0 sdc 8:32 active ready running `-+- policy='queue-length 0' prio=10 status=enabled `- 2:0:0:0 sdb 8:16 active ready running
在fdisk中就可以直接看到这个“硬盘”:
1
2
3
4
5
6
7
8
$ sudo fdisk -l ... Disk /dev/mapper/mpatha: 10.7 GB, 10737418240 bytes, 20971520 sectors Units = sectors of 1 * 512 = 512 bytes Sector size (logical/physical): 512 bytes / 512 bytes I/O size (minimum/optimal): 512 bytes / 524288 bytes ...
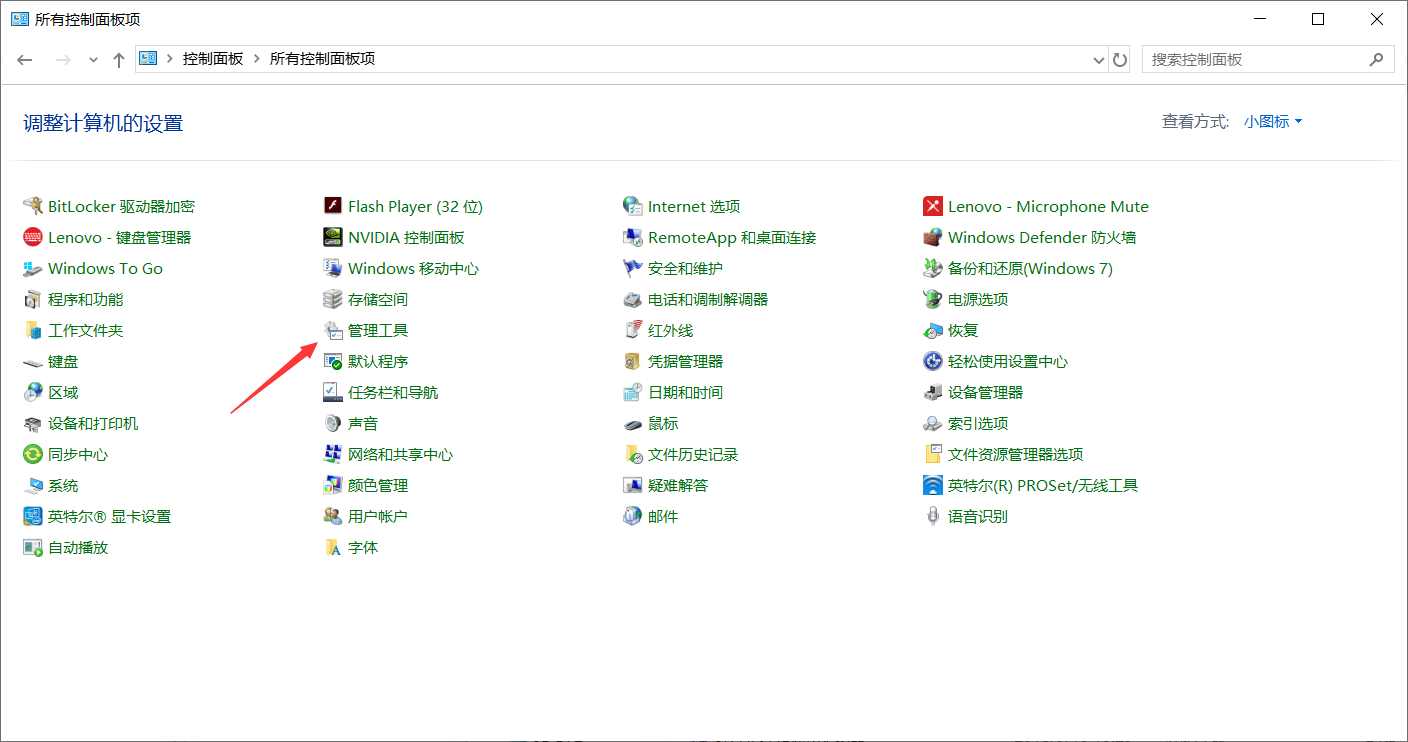
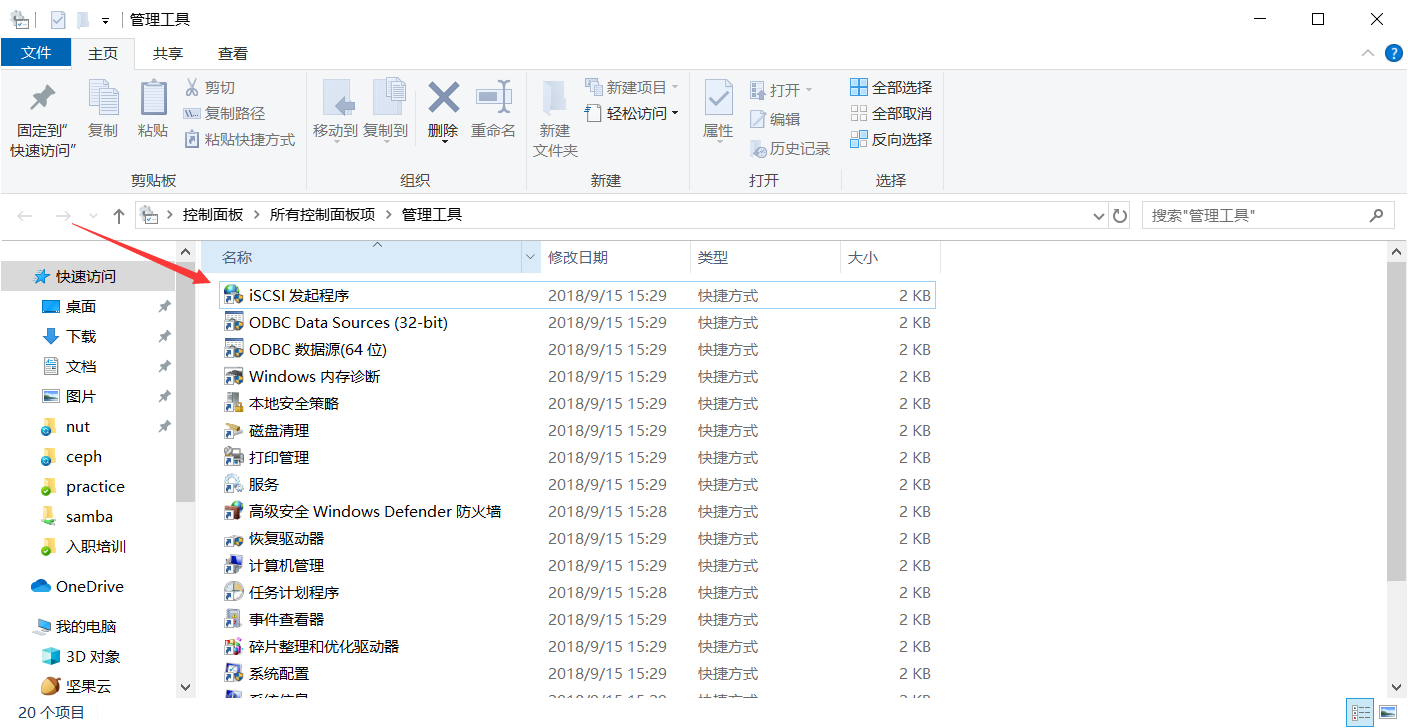
windows客户端配置 在控制面板->管理工具->iSCSI 发起程序:
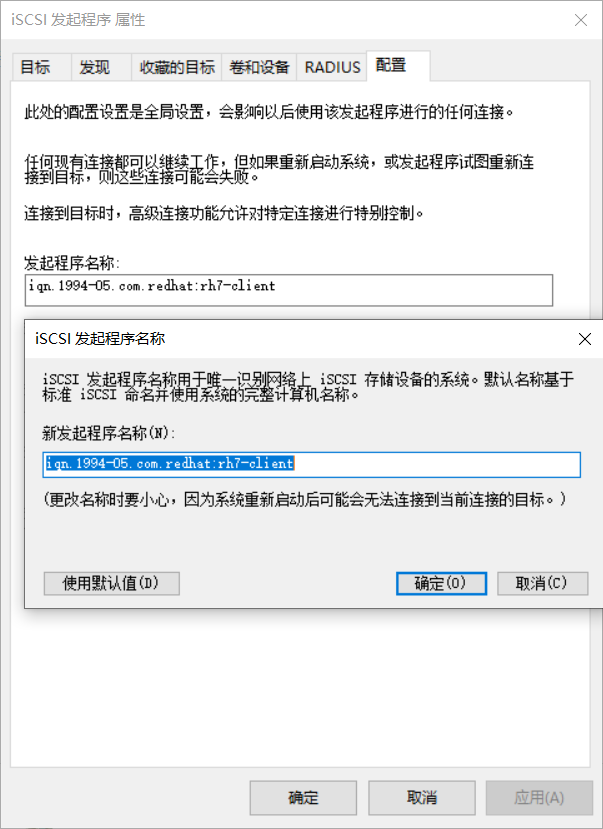
修改发起程序名称:
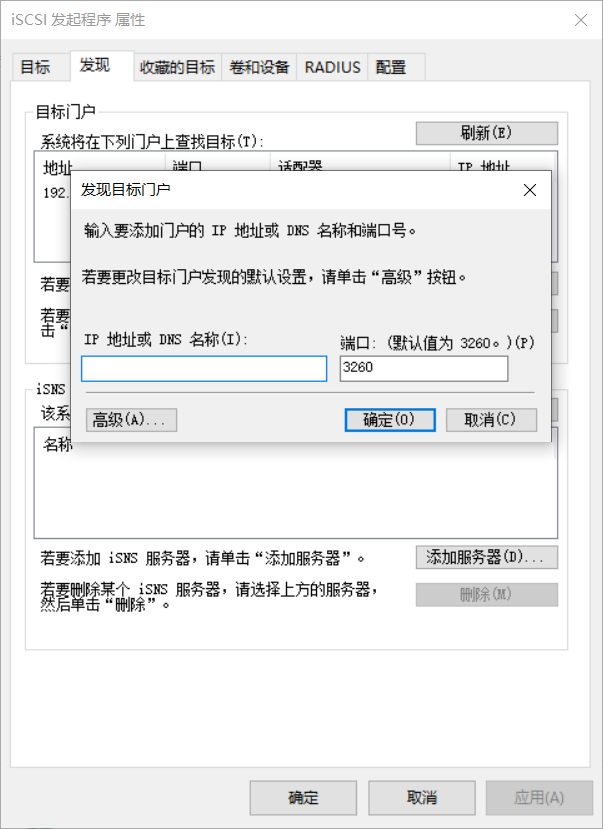
添加发现目标门户:
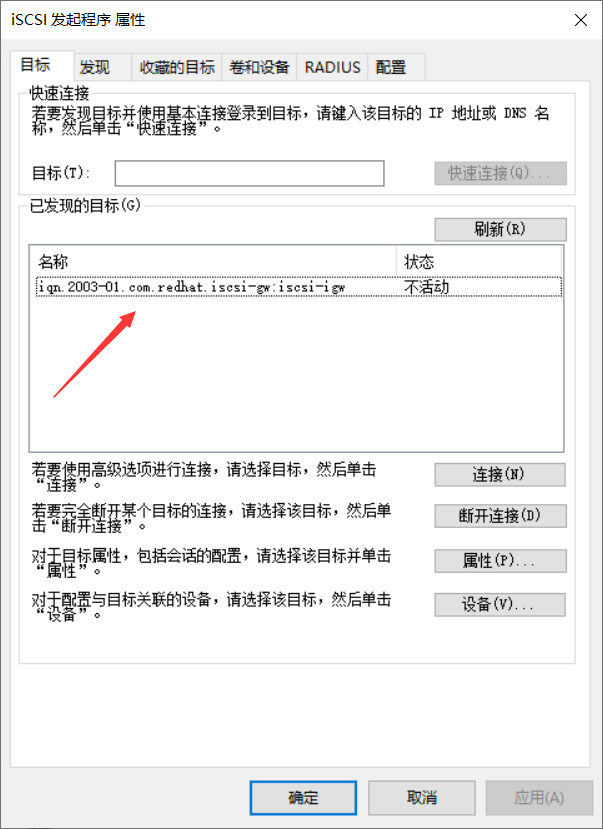
可以看到出现目标:
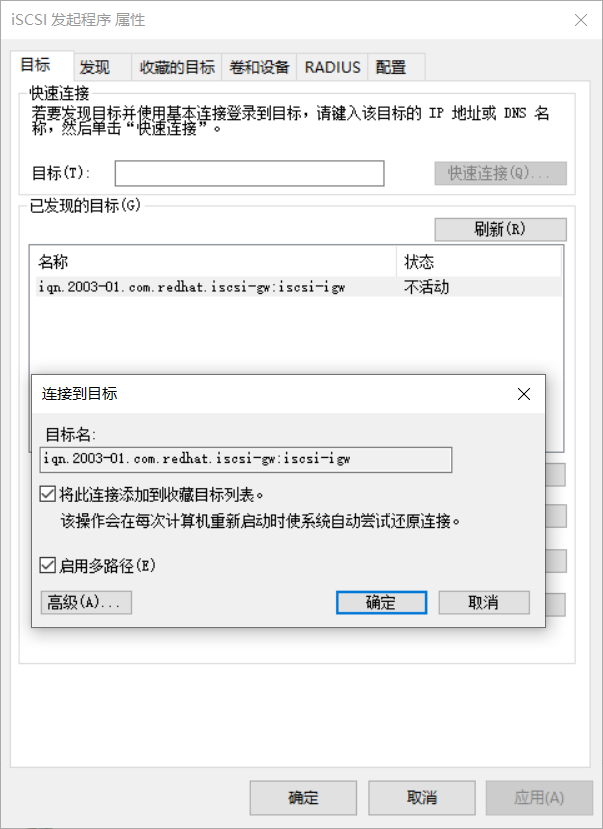
连接到该目标:
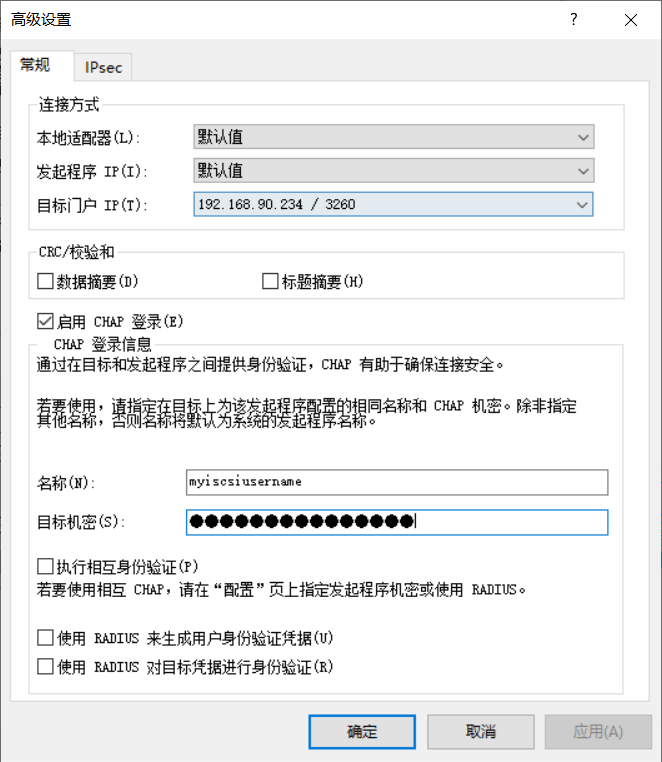
修改高级设置:
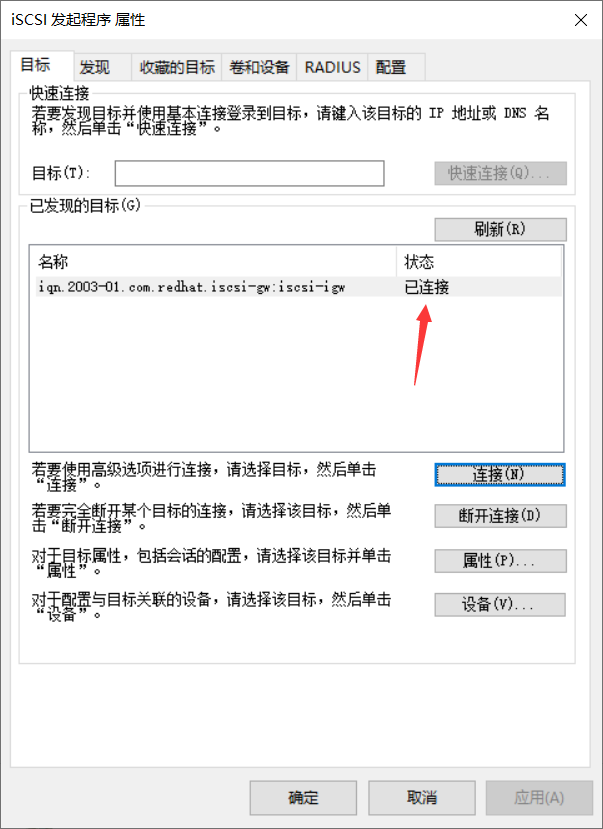
可以看到已连接:
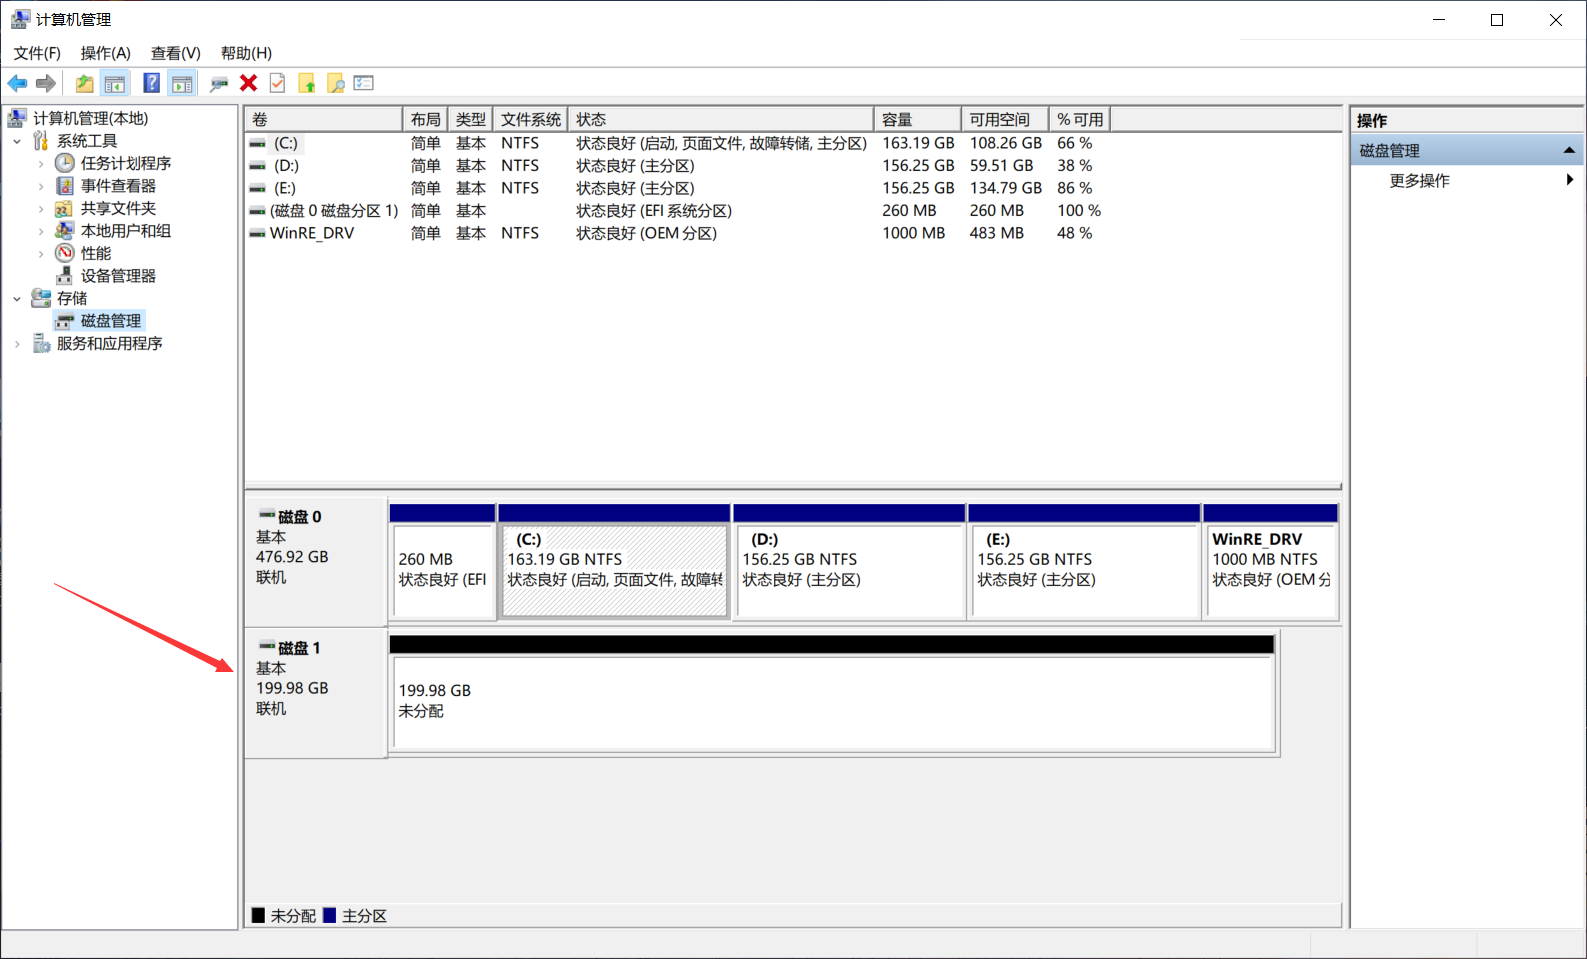
可以在磁盘管理中看到硬盘已经连接:
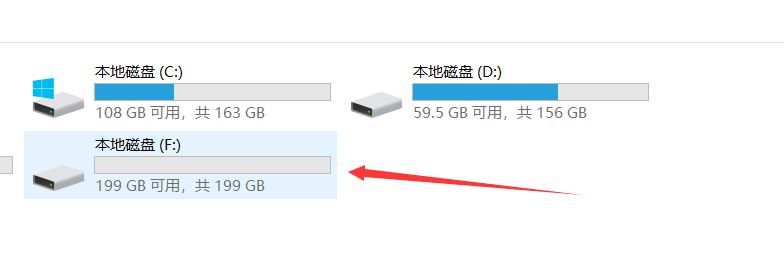
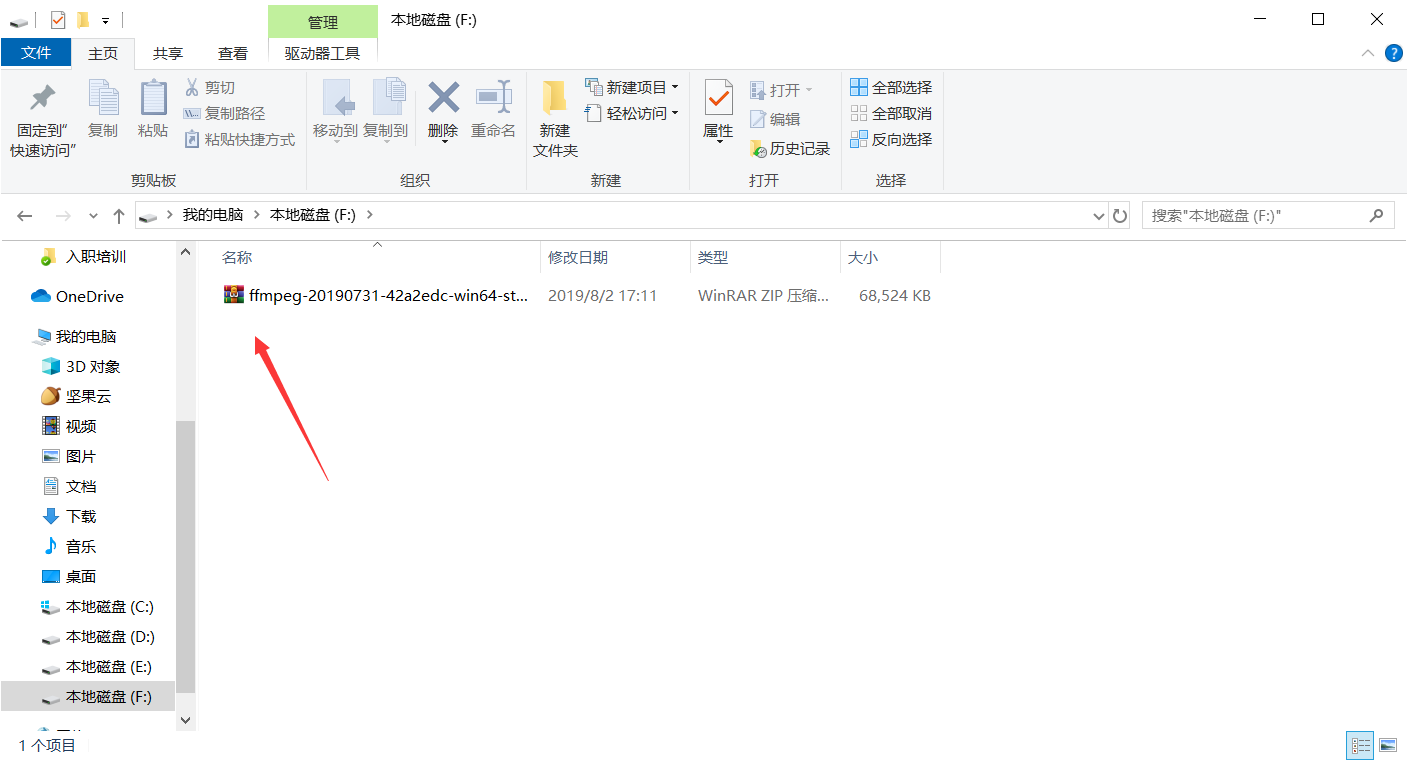
这里将它分为F盘,并且成功往里面放了一个文件:
Health Warning 注意到此时ceph集群可能会出现一个Health Warning:
1
2
3
4
5
6
7
8
9
10
11
12
13
14
15
16
17
18
19
20
21
22
$ sudo ceph -s cluster: id: 51e9f534-b15a-4273-953c-9b56e9312510 health: HEALTH_WARN application not enabled on 1 pool(s) services: mon: 3 daemons, quorum node1,node2,node3 mgr: node1(active), standbys: node2, node3 mds: cephfs-1/1/1 up {0=node1=up:active} osd: 6 osds: 6 up, 6 in tcmu-runner: 2 daemons active data: pools: 3 pools, 192 pgs objects: 559 objects, 2.1 GiB usage: 27 GiB used, 6.0 TiB / 6.0 TiB avail pgs: 192 active+clean io: client: 2.5 KiB/s rd, 2 op/s rd, 0 op/s wr
从官网中可以看到这个warning发生的原因New in Luminous: pool tags ,
另外使用ceph health detail也可以看到解决方法:
1
2
3
4
5
6
$ sudo ceph health detail HEALTH_WARN application not enabled on 1 pool(s) POOL_APP_NOT_ENABLED application not enabled on 1 pool(s) application not enabled on pool 'rbd' use 'ceph osd pool application enable <pool-name> <app-name>', where <app-name> is 'cephfs', 'rbd', 'rgw', or freeform for custom applications.
这里就将所建立的rbd池标记为rbd :
1
2
3
4
5
6
7
8
9
10
11
12
13
14
15
16
17
18
19
20
21
22
23
24
25
$ sudo ceph osd pool application enable rbd rbd enabled application 'rbd' on pool 'rbd' $ sudo ceph -s cluster: id: 51e9f534-b15a-4273-953c-9b56e9312510 health: HEALTH_OK services: mon: 3 daemons, quorum node1,node2,node3 mgr: node1(active), standbys: node2, node3 mds: cephfs-1/1/1 up {0=node1=up:active} osd: 6 osds: 6 up, 6 in tcmu-runner: 2 daemons active data: pools: 3 pools, 192 pgs objects: 559 objects, 2.1 GiB usage: 27 GiB used, 6.0 TiB / 6.0 TiB avail pgs: 192 active+clean io: client: 2.0 KiB/s rd, 1 op/s rd, 0 op/s wr
问题解决。
参考 CEPH ISCSI GATEWAY
看Ceph如何实现原生的ISCSI
Build new RPM for 3.0
Missing ceph-iscsi-cli package
New in Luminous: pool tags
