练习目标 使用iso镜像搭建一个本地源,安装httpd服务并局域网yum install成功
所需准备
两台centos虚拟机(一般是mini安装),一台作为yum源,一台测试yum源。
一个centos的iso镜像,这里选择的是CentOS-7-x86_64-Everything-1804.iso。
配置好网络,起码两台虚拟机能相互ping通。
配置本地yum源 本地yum源 ,意思就是只有本机能够使用的yum源,这里需要先配置本地yum源,
然后再将其公布到局域网。
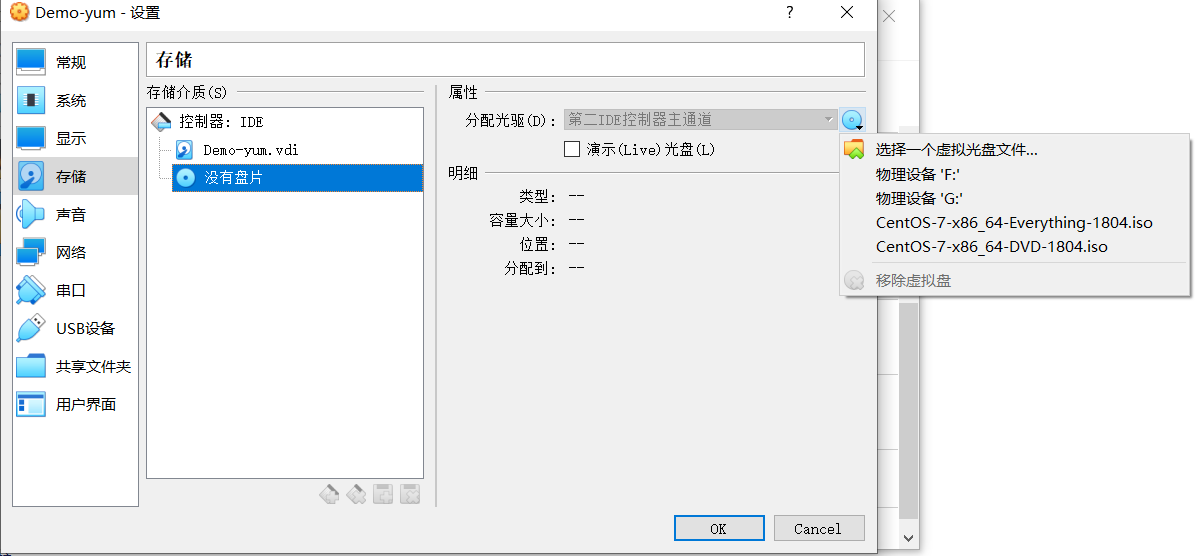
使用iso镜像搭建本地yum源,这里首先将iso镜像进行挂载:
完成后,iso镜像就已经挂到了/dev/cdrom目录上,新建一个目录将它挂载:
1
2
3
4
5
6
7
8
9
10
11
12
13
14
15
16
17
18
19
20
$ mkdir /mnt/iso $ mount /dev/cdrom /mnt/iso mount: /dev /sr0 is write -protected , mounting read -only $ ll /mnt /iso total 1640-rw -rw -r -- 1 root root 14 May 2 2018 CentOS_BuildTag drwxr -xr -x 3 root root 2048 May 4 2018 EFI -rw -rw -r -- 1 root root 227 Aug 30 2017 EULA -rw -rw -r -- 1 root root 18009 Dec 10 2015 GPL drwxr -xr -x 3 root root 2048 May 4 2018 images drwxr -xr -x 2 root root 2048 May 4 2018 isolinux drwxr -xr -x 2 root root 2048 May 4 2018 LiveOS drwxrwxr -x 2 root root 1640448 May 3 2018 Packages drwxrwxr -x 2 root root 4096 May 7 2018 repodata -rw -rw -r -- 1 root root 1690 Dec 10 2015 RPM -GPG -KEY -CentOS -7 -rw -rw -r -- 1 root root 1690 Dec 10 2015 RPM -GPG -KEY -CentOS -Testing -7 -r --r --r -- 1 root root 2883 May 7 2018 TRANS.TBL
然后将这些文件都复制出来(貌似也可以不复制出来,直接使用/mnt/iso目录作为本地源目录):
1
2
$ mkdir /home/long/yum $ cp -r /mnt/iso/* /home/long/yum
将现有的.repo文件备份,随便新建或者复制一个.repo文件,修改其中的内容:
1
2
3
4
5
6
7
8
9
10
11
12
$ cd /etc/yum.repos.d/ $ mkdir bak $ mv *.repo bak $ cp bak/CentOS-Base.repo . $ vim CentOS-Base.repo [base] # yun源的名字,唯一即可 name=CentOS-$releasever - Base # 注释信息,随便 baseurl=file:///home/long/yum # yum源路径,支持三种协议:http、ftp、file enabled=1 # 1 表示启用,0 表示禁用 gpgcheck=0 # 指纹校验,为0 表示不校验 gpgkey=file:///etc/pki/rpm-gpg/RPM-GPG-KEY-CentOS-7 #校验参考的文件
清除默认源,重新缓存本地源:
1
2
3
4
5
6
7
8
9
10
11
12
13
14
15
16
17
18
19
20
$ yum clean all Loaded plugins: fastestmirror Cleaning repos: base Cleaning up everything Maybe you want: rm -rf /var/cache/yum, to also free up space taken by orphaned data from disabled or removed repos Cleaning up list of fastest mirrors $ yum makecache Loaded plugins: fastestmirror Determining fastest mirrors base | 3 .6 kB 00 :00 :00 (1 /4 ): base/group_gz | 166 kB 00 :00 :00 (2 /4 ): base/primary_db | 5 .9 MB 00 :00 :00 (3 /4 ): base/filelists_db | 6 .9 MB 00 :00 :00 (4 /4 ): base/other_db | 2 .5 MB 00 :00 :00 Metadata Cache Created $ yum list
测试本地yum源是否配置成功:
1
2
$ yum install httpd $ yum install wget
到这里本地yum源就搭建成功了
配置局域网yum源 上面已经安装了httpd服务(yum install httpd),它默认的目录是/var/www/html,这里需要对它进行修改:
1
2
$ rm -rf /var/www/html $ ln -s /home/long/yum /var/www/html
下面启动httpd服务,随便把它设置为开机自启:
1
2
$ systemctl enable httpd $ systemctl start httpd
验证是否启动成功,在另一台虚拟机上进行测试:
1
2
3
4
5
6
7
8
9
10
11
$ wget http://192 .168 .31 .201 /RPM-GPG-KEY-CentOS-7 --2019 -07 -15 17 :55 :08 -- http://192 .168 .31 .201 /RPM-GPG-KEY-CentOS-7 Connecting to 192 .168 .31 .201 :80 ... connected. HTTP request sent, awaiting response... 200 OK Length: 1690 (1.7K ) Saving to : ‘RPM -GPG -KEY -CentOS -7’100%[=================================================================================================================================>] 1,690 --.-K /s in 0s 2019-07-15 17:55:08 (3.62 MB /s ) - ‘RPM -GPG -KEY -CentOS -7’ saved [1690/1690]
这里就完成了局域网yum源的配置。
使用局域网yum源 方法和使用本地yum源一样,唯一不一样的地方在于将file修改为http:
1
2
3
4
5
6
7
8
$ vim CentOS-Base.repo [base] name=CentOS-$releasever - Base baseurl=http://192 .168 .31 .201 :80 / enabled=1 gpgcheck=0 gpgkey=file:///etc/pki/rpm-gpg/RPM-GPG-KEY-CentOS-7
尝试使用:
1
2
3
4
5
6
$ yum install vim Loaded plugins: fastestmirror Loading mirror speeds from cached hostfile Package matching 2 :vim-enhanced-7 .4 .160 -4 .el7.x86_64 already installed. Checking for update. Nothing to do
ok
过程中的问题 403 Forbidden:
在执行wget http://192.168.31.201/RPM-GPG-KEY-CentOS-7命令时,出现403错误。
这里可能是由于一下的问题造成的:
1
2
3
$ systemctl status firewalld $ systemctl disable firewalld $ systemctl stop firewalld
selinux问题。解决办法:关闭selinux。
1
2
3
4
5
6
7
8
9
10
11
12
13
$ getenforce Enforcing $ vim /etc/sysconfig/selinux SELINUX=disabled $ reboot $ getenforce Disabled
在centos上,httpd的log文件记录在/var/log/httpd/目录下,有access_log和error_log,
在access_log中可以看到接入信息,error_log中可以看到错误信息,这些信息十分有用。
查看error_log:
1
2
3
4
5
$ sudo tail /var/log/httpd/error_log ... [Mon Jul 15 09 :50 :49 .577353 2019 ] [core:error] [pid 1303 ] [client 192 .168 .31 .202 :37660 ] AH00037: Symbolic link not allowed or link target not accessible: /var/www/html ...
可以看到问题在于权限不够,这里需要将/home/long/yum从上到下这几个目录都添加执行权限:
当然这样将所有的文件和文件夹都添加了执行权限,实际上应该只需要将文件夹添加可执行权限就好。
2019-07-18补充 在上面的操作过程中,使用的是iso镜像,镜像是已经建立成repo仓库的,所以可以直接使用。
但是 ,如果现在有一堆rpm文件在一个文件夹下,直接像上面那样是不行的,因为它还不是一个repo仓库,
简单来说就是文件中不包含repodata文件夹。
所以这里引入createrepo 命令来将一个文件夹做成一个repo仓库。
可以直接使用yum安装它:
1 $ sudo yum install createrepo
比如将文件夹/home/tmp创建为repo仓库:
1 $ createrepo -p -d -o /home/tmp /home/tmp
如果在文件夹中又加入了新的rpm文件,则需要更新仓库:
1 $ createrepo --update /home/tmp
参考 CentOS7 配置局域网内软件源 http模式
临时和永久关闭Selinux
解决Symbolic link not allowed or link target not accessible问题一例
